- Follow us:
- Our Commodities:
-
October 2023
| PIETMAN BOTHA, INDEPENDENT AGRI- CULTURAL CONSULTANT |
 |
Suboptimal planter performance results in irregular seed depth, seeds at the soil surface, open seed slots, compacted soil on top of the seeds, hair pinning and sidewall compaction. Other problems include skips, doubles and triples – and at the end of this, the yield will be lower and the income will be less.
You may be able to get away with a poorly maintained planter in conventionally tilled soil, but not in tough no-till conditions. No-till and conventional planters must be able to plant through heavy crop residue, penetrate firm soil, open a perfect ‘V’ slot, place singulated seeds at equal distances and at uniform depth, close the seed slot so seeds have proper seed-to-soil contact, not cause sidewall compaction and not excessively compact soil on top of the seed. All these things must be done while driving 6 km/h to 10 km/h, dropping ten to 20 seeds per second.
To avoid planting problems, first check that your equipment is working properly, and then regularly check the planter performance in the field and change the settings at planting time.
The following 14 points need to be evaluaæted:
1 Meters
Dysfunctional seed metering units result in skips, doubles and triples, with a loss in yield. To guarantee optimal performance, take metering units apart, remove dirt and clean the hood with soapy water. Replace cracked plastic covers. Replace broken fingers in a finger-pickup meter. Reset the tension on the fingers and tighten them correctly. Check backplate and seed brushes for wear and replace as needed. Also check the belt in finger-pickup meters. It should be flexible, not have cracks in it and should be clean. You can lubricate the meter with graphite.
It makes sense to take your finger-pickup metering unit to a dealer to have it calibrated. If you have a vacuum or air meter, check that the vacuum or air pressure is correct, check for leaks and wear on knock-off brushes and repair/replace as needed.
2 Planter unit
Accurate depth placement can be compromised if planter units are loose or wobbly. You should not be able to easily lift a planter unit or move it sideways. Look across your planter units from the side. Are they all at the same height? If one unit is either up or down compared to the others, it needs attention. A common problem is that some bolts are loose or that additional bushings are needed. You also need to replace cracked or broken seed hoppers.
3 Seed-opener disks
Seed-opener disks need to have a minimum diameter (check operator manual), or they will not place the seed at the appropriate depth. On the majority of planter brands a system of two seed discs touching each other is used to open the furrow in the soil, where you will then place your seed. The relation between these two discs is extremely important to ensure that you get a clean, uniform ‘V’-shaped furrow to place your seed into.
When the seed disc spacing is not correct and dirt is able to move between the seed discs, it causes issues such as:
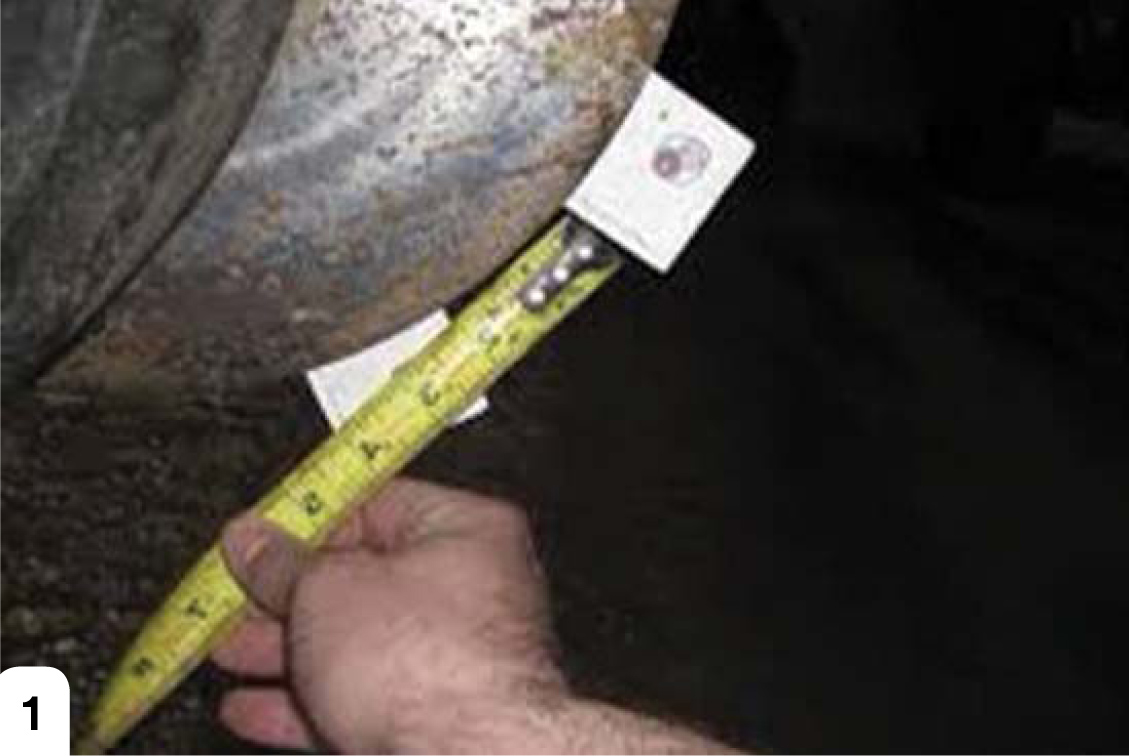
Put two business cards between the openers and move them as close together as possible to check this (Photo 1.) If the opener disks are worn too much, you will get a ‘W’-shaped seed slot instead of the desired ‘V’ slot. Insert one card at the top of where the two discs make contact and one at the bottom, just enough for the contact point to hold the cards. Measure the distance between the two cards. The ideal is to achieve 6 cm contact between the cards. If the gap between the cards is too small, remove the shims. If it is too big, add shims to ensure you get 6 cm of contact.
Make sure the opener discs are not worn too much.
Source: https://www.striptillfarmer.com/articles/4186-how-to-check-your-disc-openers
4 Seed tubes
The end of seed tubes may wear to the extent that it curls inwards, catching seeds. There is often a hook halfway up that can easily break off. Seed tube guards need to have a minimum width and be fastened correctly, or damage to the seed tubes is likely. Clean seed sensors if your planter was fitted with it.
5 Seed firmers
These help to press the seed down in the furrow, guaranteeing more accurate depth placement of the seeds. The tension can be adjusted with a bolt. If the seed firmers are worn too much, they need to be replaced.
6 Depth wheels
This is often a much-debated topic regarding what type of depth gauge wheel is best – close to the seed disc or far away from it. The most common is a depth gauge wheel that makes light contact with the seed disc. When there is a gap between the gauge wheels, it allows for dry dirt to make its way between the disc and gauge wheel, causing a ‘rooster tail’ effect of dry dirt in the rim or lip of the gauge wheels. This dirt then flicks up from the gauge wheels and lands in the furrow contacting the seed, causing germination problems. See Photo 2.
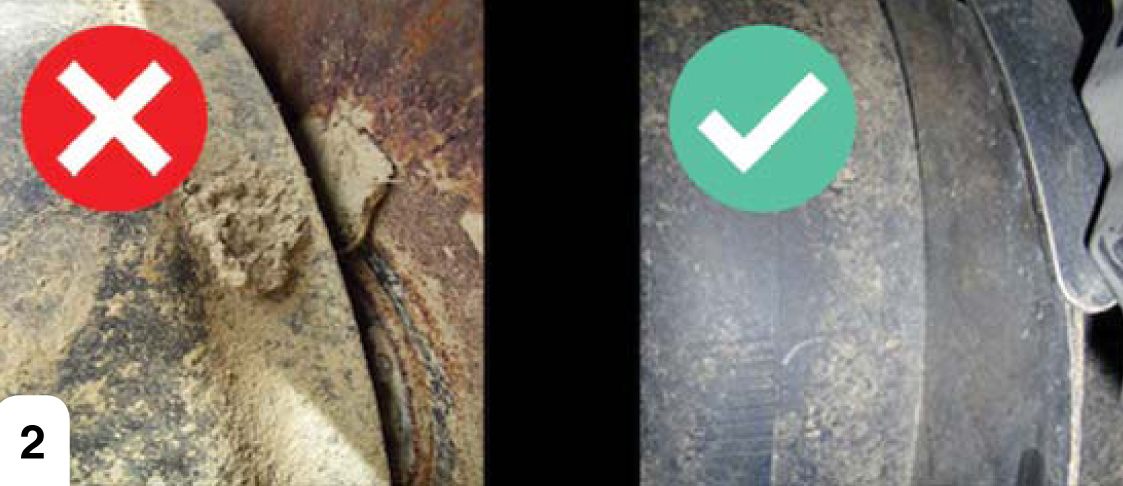
A gap between the depth gauge wheel and the seed disc can cause problems.
Source: https://www.striptillfarmer.com/articles/4186-how-to-check-your-disc-openerscheck-your-disc-openers
As your planter wears, or even on a new planter, the spacing between gauge wheels and seed discs can change.
To ensure the correct gauge wheel spacing, check that the arms aren’t bent, the tyres aren’t worn past their respective wear marks and the bearings are still in good condition. Lift the planter, place blocks under the gauge wheels and lower the planter back down onto the gauge wheel blocks. Then use the respective planter’s type of adjustment to adjust the gauge wheels to where the gauge wheel is making light contact with the seed disc at a ground-engaging height but is still able to rotate.
7 Coulters
Check the diameter of the coulters and replace it if necessary. You should adjust the depth setting of worn coulters that are still usable.
8 Row cleaners
Check for wear. Adjust to compensate for wear or replace if worn too much.
9 Closing wheels
Closing wheels need to have an intact spring and need to be checked for damage or wear. Bearings cannot be wobbly or too tight. The bottoms of rubber or cast-iron closing wheels need to be 37 mm to 50 mm apart. The closing wheel arm cannot have too much play. If so, bushings or the entire arm may need to be replaced.
10 Alignment of coulters, opener disks and closing wheels
Take a rope and pull it straight from the front coulter to the closing wheels. The firming wheels, seed openers and coulters should all be in line. Closing wheels should not run on top of the seed furrow.
11 Insecticide boxes
The insecticide boxes should have no holes or cracks. Tubes should be blown out with air as well as the slot on the bottom of the meter.
12 Fertiliser unit
Fertiliser opener disks should have a minimum diameter (check manual). The bearings should not be wobbly or too tight. Hang a bucket below the tube of the unit and do a test run. Compare the fertiliser weight to the expected weight and recalibrate the planter to make sure the desired fertiliser is applied.
13 Chains and sprockets
Check all chains and sprockets. If it is worn or chain links are stiff, it needs to be replaced. Chains need to have the appropriate tension and should be lubricated properly.
14 Tyre pressure
Inflate tyres to correct the pressure – remember this wheel is driving nearly everything on the planter.
For more information, contact your local dealer to help setting up your planter.
Publication: October 2023
Section: Pula/Imvula